Install the complete camera at the construction site
To yourself construction supervision unit or other supply during Modular camera installation to shop, larger stores can be factory, agency office, workshops or public works…then you must understand the process as well as the necessary equipment and tools to mount a camera is how?
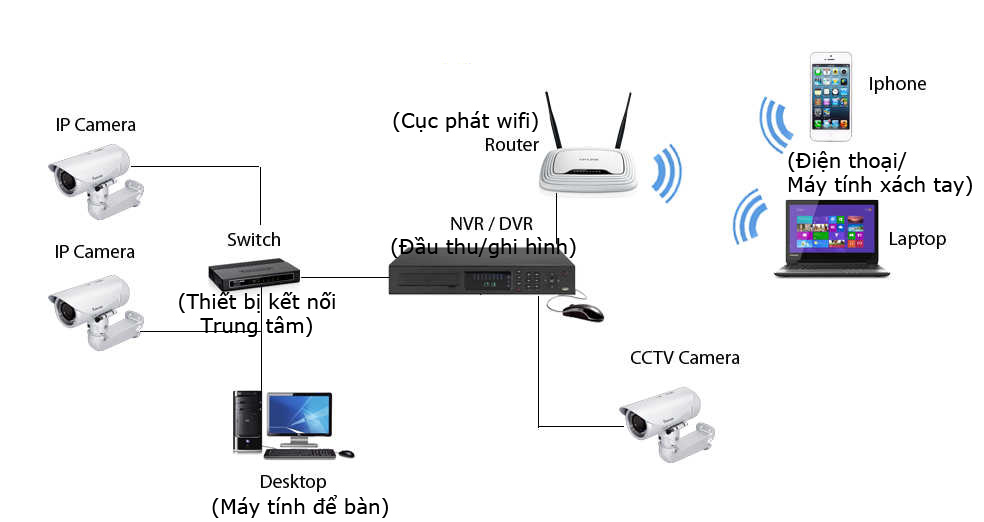
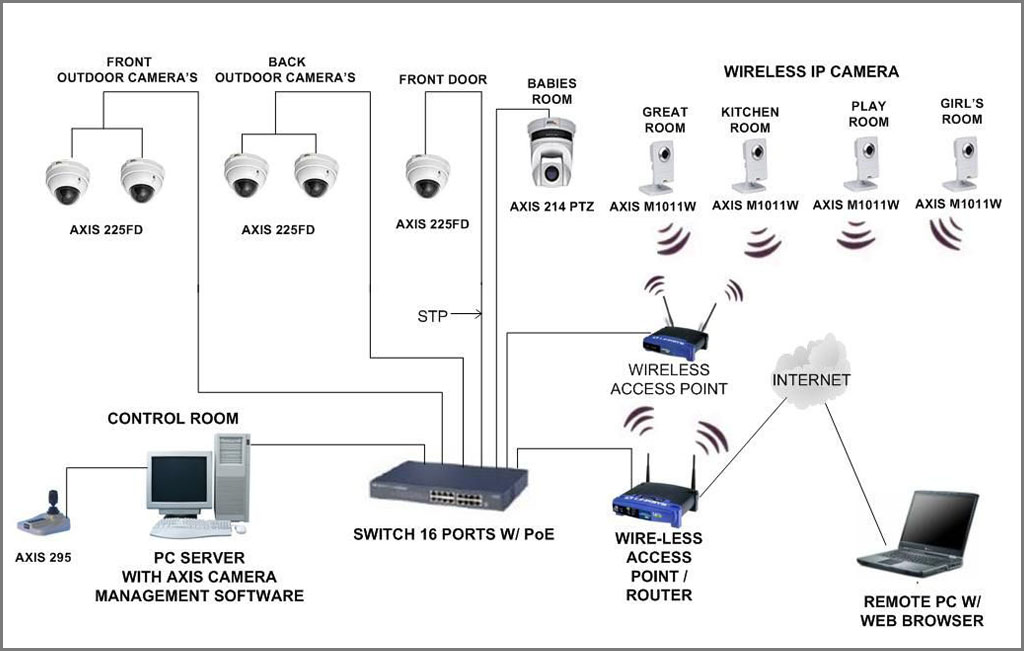
We will use specialized terminology associated with the interpretation by Vietnamese to describe the device as well as diagrams related to system camera connected to your perfect Read more understandable.
Learn Diagram illustrating connections
There are many diagrams describing a CCTV system now from simple to complex, we will choose the simple diagram brief understandable to you visualize nhé.


Preparation equipment – tools needed
The first thing you think of that's going to buy a camera where? Camera vendor just as good, your pocketbook, select unit price, installation services, Warranty like? and many related questions that you need answers.
If you self-construction, you equip some necessary tools for you to work, also if you rent another unit, you only monitoring, checking and using. Here are the necessary equipment to execution and installation Modular Camera as follows:
Camera, DVRs, Hard drive storage, Display, Adaptor, wire interface, Network cables, Drill wall, screws, stopper, Bandage 2 face, Plastic brace, Aluminum ladders to climb. Screwdrivers. pincers, Plastic drawstring, Electrical tape. BNC jack and lock F5
If you have internet access, use wireless transmitters and swicth availability or without the internet, they must alo supplier to complete the construction of the Internet before the camera.
see more:
– Solution factory installed camera
– Solutions installed the camera hospital
STEPS TO INSTALL CAMERA AS FOLLOWS
1. Locate to mount cameras, DVRs
For camera: Before mounting the camera onto the camera position has been thoroughly tested to ensure images are not nhè, noise or color renders the construction will then smoothly without interruption.
You need to select a camera position can cover all areas and directions camera into position to observe pay attention to avoid camera mounted opposite sunlight. If the camera is used in the mounting location must not be wet by rain, waterproof and sunlight shining directly. If the camera is used outdoors, it will itself have protective outer layer to limit the impact of the setting sun, rain.

For DVRs: Find the mounting location of DVRs to facilitate the management and operation control to establish a connection with the display in case of no use to watch via the Internet. If the user to see through the Internet, it must be placed near video recorder wifi modem to connect to the internet
2. Wiring source, signal wire and fixed line
The source wiring, signal wire, Cable networks, wall, travel along the ceiling or wiring must be in accordance with the actual situation on the criteria to save cord, less drilling ensure aesthetic wall.
When you're drawing is apparently going for cable, carried away for serial cables entire camera attached and location right Recorder. You should spread a little to full room than the song, noting that the wiring is not deficient (because then you will have to reconnect wires, this is basically still ensure signal quality, but takes time).
When finished wiring patterns should be used electrical tape drawstring and conducting wires bundle segments common to definitely avoid flammable and explosive scruffy users.
To determine the power supply for the camera always avoid losing power source resulting in camera not working
3. Connecting cables, power cord with Camera, Recording / Switch
Use pliers to BNC connectors in 2 first signal cables, tape tightly lashed to the water does not reach the connector. Ensure correct connector work, and certainly. Then proceed to connect the signal cable in 2 cable head, 1 The camera head to head fighting game remaining on the rear connector DVRs
Turn off the power breaker to conduct electrical connection for each camera source. After connecting source you can check whether the camera was powered not by using hand covering the infrared sensor, if the camera is powered infrared lights will light up red.
4. Connect with display (Television, Computer screen) with Switch / Recorder
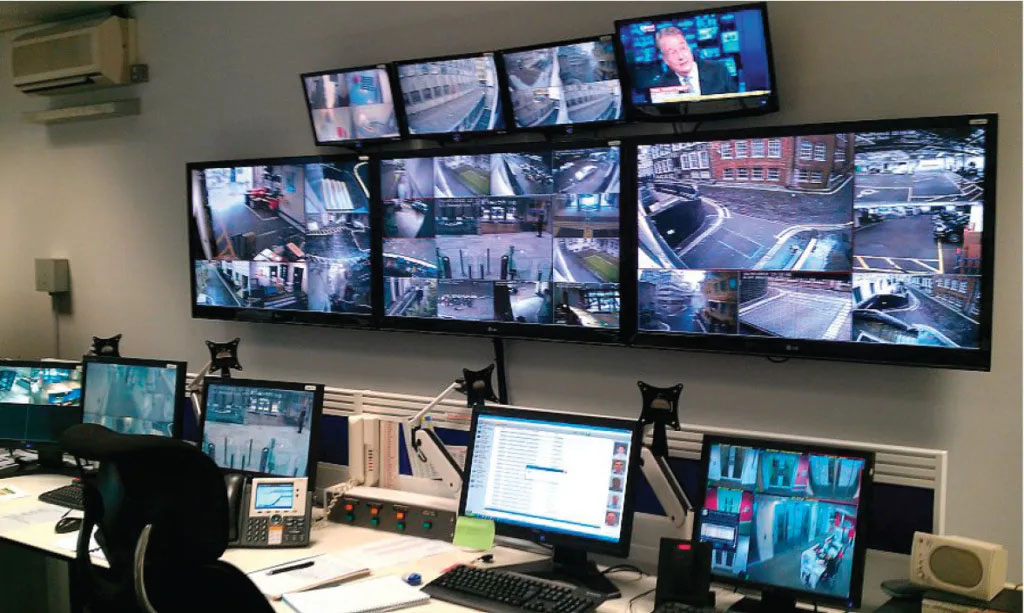
After connecting the signal cables and power supply for the camera, we will connect the recorder to display to check The camera, mounted has been active on form or not. Separate analog cameras use coaxial cable, you simply connect to the recorder, the camera will display observations immediately without further configuration. (Note, switch video sources to the correct HDMI input on your TV).

At this step, If anyone does not yet making up camera, or interference you need to check cables, tight connectors were not considered and processed immediately. Due in step 1 we have checked and make sure the cameras are working well so sure if the camera is not in step with desktop or interference, the cause can only be caused by the transmission medium, signal cable damaged, fluid connector, or too much noise environment, or distance mounting too far, surpassing the permitted standards.
You check each step to fix ensures correct camera display, clearly review images on a TV screen. Come work installation of camera systems almost succeeded, then it, next step is:
5. Configure the camera to view images through the Internet
How can install to view the images via the Internet by Camera? Where to when we can check all activities in locations where we installed a camera earlier.
Here we guide how to configure and install cameras to be able to view images via the Internet (ADSL) or fiber (Having a static IP)
REQUEST: Usually when Modular cameras installed security observation to track the internet, you must have the following network devices:
–> Internet connection: Typically customers will be 1 in 2 type the following line, depending on type of transmission line would follow different instructions nhé.
Customers using conventional ADSL line will be configured
- create 1 Free Domain
- Configure the modem connection with domain names registered in the.
Customers using optical transmission (FTTH) there are just static IP configuration
- Just forword port that allows direct viewing
–> Recorder images from the camera:
- Currently most of the DVRs support analog watch online
- For IP cameras support the view directly without DVRs.
–> Remember the IP address to plug into the recorder port configuration forword
HOW TO CONFIGURATION AS FOLLOWS:
A. For customers using ADSL then we must perform the following:
Free domain name registration you register at: “www.dyndns.org” after registration is complete you will be:
- Free domain name called: tenmien.dyndns.org (or any domain you choose examples: NguyenVanA.dyndns.org).
- User login name in the address registered on (The user name)
- Login password registered in the
ADSL modem configuration:
- Installation and filling parameters: “Domain, User, Pass” in steps on the domain name registration to the modem or your video recorder
You access the modem or your recorder to find items or DNS DDNS to enter the parameters in step on on on -> Then you reboot reboot modem
Attention: After configuration is complete, but still can not see through the network, then you test to see the domain registration information to the modem has at the address set by the customer yet:
- At the command prompt windows (By selecting Start / Run -> Typewriter CMD -> enter) -> the command window -> you type your domain Ping has registered the domain name in step (For example: NguyenvanA.dyndns.org) -> if the result returns the following type of network it is adopted: (O results shown within the red)
B. For customers using fiber-optic lines with static IP:
- Just as unique is forword port on the modem is. You login the web management interface modem -> Find items NAT (or forword port) -> Mark sisters IP recorder plugged in and ports you need to open -> (enable - to enable) -> Save to save. Done reboot the modem you remember nhé
Above we have shared with you, as well as the installation process installation and installation Modular Camera look through detailed Internet, hope you can install for your device's camera.
see more: Installation of CCTV - genuine standards
————————————————————————————————————————————————–
All information is carefully your answer, please contact:
TELECOMMUNICATION COMPANY LIMITED NUMBER ONE
Tel: 028.3862 0441
Hotline: 0903 05 1991
Email: info@onetel.com.vn

